Pulling Apart Some Sunshine Hubs

My Team Mongoose BMX originally came with a set of Araya 7X rims laced to some nice black and silver sealed-bearing Sunshine Hubs. After sitting around for 20 years, the bearings have dried up and stuck in place. It's time to pull apart the hubs and replace the sealed bearings and bring a little life back into these worn hubs.

Sunshine BMX hub soaking in WD-40

I pulled apart the hubs and begun trying to pry the bearings out. They would not budge. I put a little more force with a screwdriver and a hammer. I had written the bearings off, ready to replace them with a new set. Still no movement. I wasn't sure what to do and Google was being of no help.

Sunshine BMX hub and WD-40

I decided to spray as much WD-40 as I could into a small cup and soak the hubs hoping to loosen the bearings up to get them out. At this point in time I didn't think I would be able to get them out, ever!

Sunshine BMX hub on wood beams

During the week I managed to find a flat head screwdriver that had a pre-bent tip. My thoughts were that this would give me a little extra leverage to be able to pop the bearings out of their socket. A week went by and I was ready to go! I placed the hubs between two pieces of pine wood, lined up the screwdriver and the hammer, a few light taps and the bearings popped right out!

Sunshine BMX hub with popped out bearing

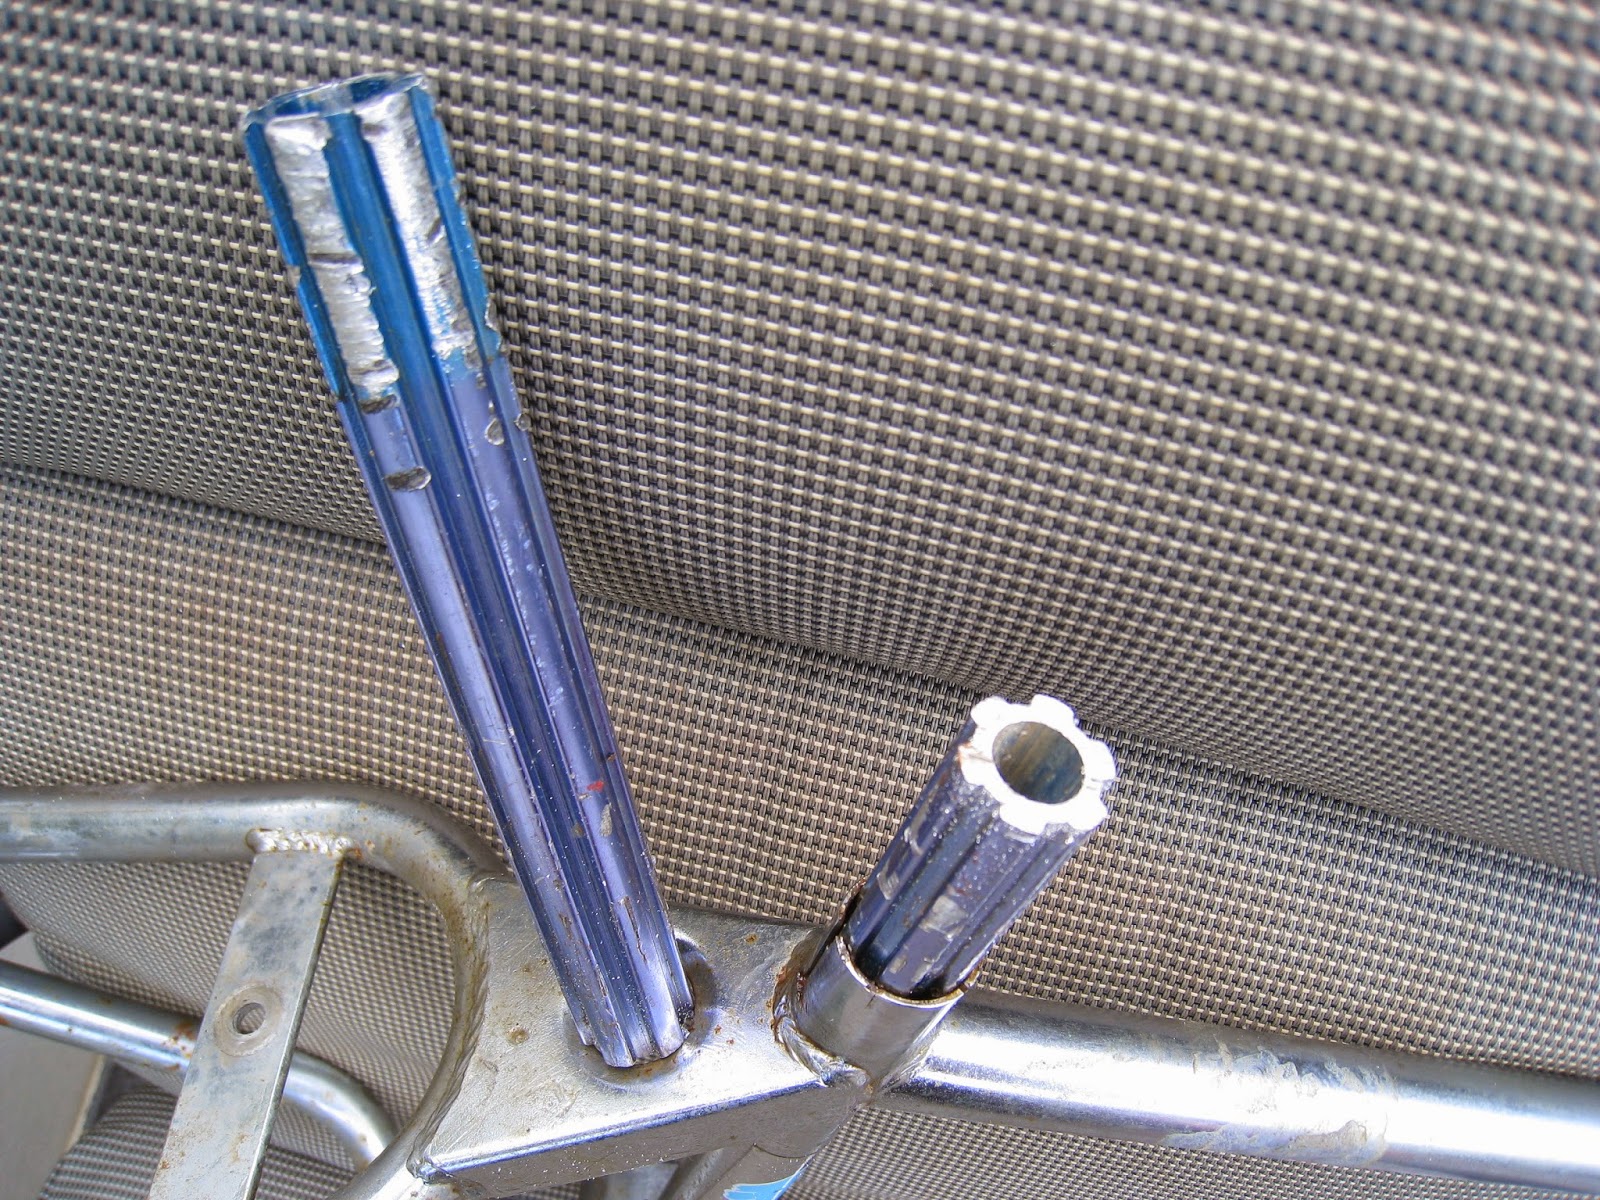
You can see the crud that had built up inside the bearing crevice that was causing the bearing to stick to the hub. I'm glad they're out. Now I can source a set of replacement bearings and have these hubs spinning beautifully again!

Sunshine BMX hub cavity with no bearing

I need to remember to use the right tools for the job. I'm going to invest in some quality tools!

My BMX Want List In December 2013

I've been speaking to a mate of mine who is completely engrossed in Old School BMX, especially the 80's BMX Freestyle genre. He's told me that over time I will learn more about Old School BMX, my tastes will change and my want lists will go from cheap riders to the high-end 80's BMX's. It happened to him and it's bound to happen to me.

I completely disagree.

I'm going to keep track of my BMX want list. These are the bikes that I love, know about and really would love to own. So, here's my list:
  • New: 1986 to 1988 Orion Freestyle
  • New: 1990 Haro Group 1a Race Technique
  • New: 1989 Titan PRO-XL
The first BMX on my list is the 1988 Orion Freestyle. This is one of the Freestyle BMX's that I remember and loved as a kid. Sydney's west was all about BMX Racing. We didn't have the options that came out in Sydney's east and south. The only freestyle BMX's that I saw growing up were the Orion Freestyle and the Haro Master. I'd love an Orion Freestyle.
1988 Orion Freestyle
The 1988 Orion Freestyle that's on my want list.
The 1990 Haro Group 1a Race Technique is the older and stronger brother to my 1990 Haro Group 1b Race Technique. It came as a full chromo frame, painted in a fluro pink into fluro orange into fluro yellow paint scheme. It's what I wanted to buy as a kid, but couldn't afford.
1990 Haro Group 1a Race Technique
The 1990 Haro Group 1a Race Technique that's on my want list.
The 1989 Titan PRO-XL is beast of a BMX made from all titanium. It was light as a feather and had an industrial raw paint job that made it wicked! Plus my best mate raced on one and he was fast!
1989 Titan Pro XL BMX
The 1989 Titan PRO-XL BMX that's on my want list,
The 1990 Haro Group 1a and the 1989 Titan PRO-XL are my nice-to-have BMX's. They're just fond memories from my past and I never got to ride them as a kid. This makes me not want to spend ridiculous amounts of money trying to get them.

I'll update this list as time goes and as I manage to snag different BMX Bikes. So what BMX or freestyle bikes are on your list?

BMX Bath Time! Oxalic Acid Rust Removal


With the stuck seat post removed, it was time for the Mongoose to have it's bath; an acid bath to remove the rust. I'd started spending a bit of time trawling the technical and restoration sections of a lot of BMX forums that are out there looking for ideas on how to restore our beloved BMX's. 

All these threads lead to the same conclusion; rust on chrome frames can be removed. There was talk of rubbing aluminium foil soaked cola or lemon juice against the frame, but this left scratches. One guy used a razor blade to gently scrape off all of the rust. Most said that the time-old method of using oxalic acid and patience was the best approach.

Oxalic acid found to be pretty tricky to track down. I went to a few Bunnings warehouses who have it advertised on their website as Diggers Rust and Stain Cleaner. This is 100% oxalic acid crystals.


Going to the store they would never be able to find it. Eventually I got them to look it up on their inventory using the Inventory Number (I/N: 0960276 if you do have head to Bunnings) and I had it in my hands. It's actually in the timber and wood painting section, not the cleaning section. The above tub is a Bell Roll-away Under-Bed Giant Storer with an 80 litre capacity and is the perfect size for a bike frame.

I filled the tub almost to the top. Wearing protective gloves, I mixed in 200 grams of oxalic acid crystals, then placed the frame, forks and the bars and seat post from my Haro Group 1b. I covered the container up and left it for 24 hours.


24 hours later you can see the rust being attacked by the oxalic acid turning it yellow in colour. A quick scrub with an old toothbrush freed the rust to fall off and left the metal showing rust free. 

I left the Mongoose soaking for three days, scrubbing the insides of all the tubing with a bristled brush to remove any rust and dirt build-up inside the tubing. I wanted to make sure that it was free from all rust before I continued on.

Here's one last photo of the inside of the bottom bracket showing the candy blue that used to coat the entire Team Mongoose.

That Damn Stuck Aluminium BMX Seat Post

When anodized aluminium and steel sit side-by-side, like they do when an anodized fluted seat post is stuck into a steel frame, corrosion can occur when other factors come into play. This causes one of the most common problems; stuck seat posts!

When I first came to own my Team Mongoose 25 years ago, I could barely touch the pedals while I was sitting on the seat. The first thing I tried to do was get the seat post out. I wiggled it, sprayed WD-40 and let that soak in, but it did nothing! 25 years on and the post was still stuck in there!

Back in the day, my mate told me his dad drilled his seat post out of his Mongoose because it was stuck. I was thinking that I was just a weak kid so I'd give it another crack. I thought with the internet on my side this time I was sure to find an answer.

The first thing I tried was some ammonia. I read a few blogs and forums saying that pouring ammonia in there and letting it settle over a few days loosened up all the crud and the post would come out with a little force. I left it in there for a week. The photo above shows the ammonia sitting in the seat post tube. A week went by and it did nothing!

A good mate of mine told me he got his stuck seat post out by soaking WD-40 in the post and between each crevice for 30 minutes, then sticking that into a vice tightly, so tight that you squashed the post. Then, using the frame as leverage, spin the post from side-to-side and you would hear a grind and it would be free. So, 30 minutes soaking with WD-40 and straight in the vice, tightened it up until the seat post was almost flat, started to turn and it completely snapped off! That trick was busted.

I decided to make a shim out of a hack saw blade and try to cut it out. I wanted to find out how far the seat post was jammed in before I started trying to cut it out. I grabbed a old coat hanger, bent one end and pushed it down until it was caught on the end of the post.


I chopped off most of the seat post and left about two inches to have something to grip onto when I squashed the post out of there.


I jimmied up a handle to the hacksaw blade using gaffer tape and went to cutting. About 3 hours in I was finally getting through the post, but only at the top.


I stuck the end of a post into a vice and begun using the frame as leverage to try to spin the post free. After a quarter of a turn I heard a crack and the top of the aluminium post snapped into pieces, but the rest was stuck inside. I had nothing left of the post to grip onto and I thought that the only thing left was to pay someone to drill the seat post out. Well, that's what I thought before I jumped onto YouTube!

I stumbled on a few videos that discussed using caustic soda to dissolve the post out of the tube. The chemistry behind this was that caustic soda has a chemical reaction that dissolves the aluminium and creates hydrogen gas, but it doesn't dissolve steal, what the Mongoose frame was made of. If you fill the seat post tube with caustic soda, the aluminium dissolves and you're left with a clean seat post tube.

I covered the bike frame in glad wrap and gaffer tape. I gaffer taped a plastic cup to the top of the seat post and tried to fill all the holes. I mixed half a tub of caustic soda into some warm water. I read somewhere that warm water helped speed the reaction, but to be careful because warm water went very volatile when you add caustic soda to it. I then poured the caustic soda solution into the cup, filling it almost to the top.


Instantly the water turned white, then brown and started bubbling. A white gas, the hydrogen gas, could be seen coming out of the brew. It hissed and spat all over the place! But, 45 minutes later, the seat post couldn't be seen any more. I let it sit for another hour, then poured what was left into a plastic container. Out came a lot of dirt, crud, rust and small shards of aluminium!

I rinsed the post tube out thoroughly with water and begun scraping the inside with a metal rod. It was completely clean and free of any of the aluminium seat post! This actually worked and it was amazing to watch!

My first big success! I've vowed never to use an aluminium fluted seat post in a bike again!

Haro Group 1b BMX... The Back End

This post is a continuation of my previous time capsule post running through the stock set-up of a 1990 Haro Group 1b Race Technique BMX and the changes that I made to it.


The Group 1b came with a Fusion TwinTorc seat post clamp. I kept the seat post clamp because that thing looked chunky and really looked cool. It's still in great shape, only the nuts and bolts are a little rusted.

The Group 1b came with an unbranded steel straight seat post and a black Fusion seat that was made by Velo. The first thing I did to my new Group 1b was to switch out the seat and seat post.


The seat was replaced with a generic BMX stamped seat as seen in the above photo. It was a lot wider than the Fusion seat. I spent a lot of time sitting while riding so I needed a little comfort. I'd even sit and ride during a race. I probably would have went a nice cushioned seat, if I didn't get laughed at! Good thing is I still have the original seat.

The seat post I switched out for a laid back seat post.  The reason why; my mate rode with a laid-back seat post so I needed one. The only difference was I was 5'11", he was 6'3". Still great to have a 1989 USA BMX laid back seat post. Sadly, I haven't been able to find the original seat post.


The drive train on the Group 1b consisted of generic 175mm cranks, an Anlun bottom bracket, a Haro Uni/Directional 43T chainring and a set of Victor plastic pedals. The cranks are pretty rusted up but the bottom bracket, spider and chainring are still in great order.


I had to get rid of the plastic pedals and throw on a set of Victor Bear Traps. These were the knock off of the Suntour XC-II, but these were the pedals that we rode back in the day. They were cheap and did the job. The pedals are pretty banged up after years of abuse. The photo above still shows some chewing gum stuck in the bear traps from back in the 90s!


Finally the wheels. These are dead-set stock. SUMO 36H 20 x 1.75 rims, exact replica's of the ARAYA rims, even down to the stamping, They were laced to Jou Yu 36H low flange hubs and had a Suntour 17T freewheel. The stock tyres on the Group 1b were Cheng Shin Comp 3-type 1.75's.

The rims are pretty thrashed. Lots of gutter rash and a few flat spots from slamming into the gutter. The tyres are complete thrashed. The skin walls are frayed and falling apart and the rear one is almost worn through in spots. There's no way they could hold air.

So that's my 1990 Haro Group 1b Race Technique. Let's get it back to a rider with some of the other parts I've always wanted!

My Haro Group 1b BMX Time Capsule


My 1990 Haro Group 1b Race Technique BMX was hanging from the rafters of my mums garage. It had not been ridden, let alone touched, in almost 15 years. It's still set up exactly how I raced it, even down to the tires. The next two posts will walk through explaining the Group 1b. I'll go through how it came off the shelf in 1990, the parts that I switched out and why. Let's go!

The Group 1b Frame was based on Mike King's frame geometry. It had a "monotrac" design. Monotrac is a trademark Haro design that combines the bent top tube towards the seat post tube and a "monostay" brake bridge.

The Group 1b came with a chromoly maintube and Haro Racing tapered forks. The condition of my frame and forks is still great for a 24 year old BMX. There are a few few scuffs and scratches, but nothing bad enough that requires a complete respray. It's a great survivor!


Starting at the front of the BMX, the Group 1b came with a Fusion stamped stem that combined a alloy top piece to a chromoly shaft. The headset was a standard black BMX headset manufactured by YST.


My headset is in great condition, except for the flaking black paint. It looks as though these were painted and not anodised so they're either chrome or metal underneath the paint. The stem has definitely seen better days. It has been battered. There are a few chips out of the sides due to being thrown around, either at races or in and out of the car. The bolts are all rusted up. There are no cracks in the stem that can be seen.

The stock braking system that came with the Group 1b consisted of an ACS 860A rear break, a Lee Chi two finger lever and an EZ Glide brake cable.


The brake cable and callipers are still in great condition with only a bit of tarnish on the callipers and some of the nuts and bolts have some surface oxidisation. The brake pads still look chunky but they've dried up and gone really hard.


The brake lever has definitely seen better days. It's covered in scratches and mounted on the wrong side of the bars. The ferrulle/cable adjuster has snapped in half. The grips in the above photo are some knock-off A'me Tri grips that came with the bars.

The Group 1b originally came with a set of Haro Racing Bars but I replaced these with a set of Powerlite Cruiser bars. A local pro from Castle Hill BMX track said the stock bars were took big for me so they were switched out. To be honest, I think I felt more comfortable on the stock bars. I've kept the original bars, with original Haro Krayton grips. They're currently mounted on my Mongoose.


That's it for this post and for the front-end of the the Group 1b. I'll continue the rest of my BMX breakdown in the next Group 1b post!

The Dents and Rust In My 1981 Mongoose Team BMX

I'm adding a few more photos of the main areas of deterioration, rust and just overall filth that this bike is in. This is just to keep a good before-and-after to show what a little work and a little effort can do, when you put your mind to something!


Here's the flattened chain-stay and the rear drop-outs. As you can see in the photo, they're both in pretty bad shape! Chain burn was a common occurrence for the 80's Mongoose and my Goose has a bad case of it! There's no way that that will get fixed any time soon unless I find a TIG welder and think about getting the frame stripped, polished and chromed.


A close-up of the chewed up drop-outs. You can still see the knurling of the drop-outs outside of the chewed up areas. These really need to be filled in.


A nice big compression dent in the top tube just above the gusset. I don't think that could be popped out and it would really cheapen the look of a new chrome job. This frame will stay survivor. I really love those sexy welds!


Here's the aluminium fluted stuck seat post, another common problem with Mongoose bikes. A mixture of dirt, water and age just makes them near impossible to remove. I don't know how I'm going to get this one out. There's also a few cracks around the seat tube eye hole that should be fixed up but won't really affect a rider/survivor.


Finally, the LUNGI forks. Some cheap, knock-off Tange TX-1200 forks that all the bike shops sold in the 80's as replacements when you blew out your nice Mongoose or Diamond Back forks. For now, these will stay until I manage to track down a nice set of Mongoose Team forks.

That's it for the before photos. It's time to get that stuck aluminium fluted seat post out!
Powered by Blogger.